Plaster repairs before painting are not optional. If you paint over cracked, blown, or damaged plaster, the new paint will fail within months. Cracks reappear, bubbles form, and edges lift. Proper plaster repair takes a few days of work, costs between $300 and $2,000 depending on the extent of damage, and is the single most important preparation step for a lasting paint finish.
I have been repairing and painting plaster walls across Orange, Bathurst, Millthorpe,Blayney, and Carcoar for over fifty years. In that time I have seen every type of plaster failure you can imagine, from hairline settlement cracks in a new build to entire ceilings collapsing in century-old homes. The Central West has some of the most demanding conditions for plaster in Australia, and understanding what goes wrong, and why, will save you money and heartache.
Why Plaster Fails in the Central West
Our climate here in Orange is hard on buildings. Sitting at 862 metres elevation, we get frost for five to eight months of the year, summer temperatures pushing past 35 degrees, and some of the highest UV levels in the country. That combination of extremes creates constant expansion and contraction in building materials. Timber framing swells in winter moisture and shrinks in summer heat. Plaster, which is rigid, cannot flex with the frame. The result is cracking.
Older homes in towns like Carcoar and Millthorpe often have traditional lime plaster over timber lath. This type of plaster is beautiful when it is in good condition, but after 100 or more years of Central West weather, the keys that hold the plaster to the lath can break away. You will notice the wall feels hollow when you tap it. That is called "blown" plaster, and painting over it is a waste of money. The paint might look good for a week, but the plaster behind it is already failing.
Common Types of Plaster Damage
Not all plaster damage is the same, and different problems need different solutions. Here is what I see most often in homes across the Central West.
- Hairline cracks. These are fine cracks, usually less than 1mm wide, that follow stress lines in the plaster. They are extremely common in homes of all ages. In newer homes around Orange, they often appear within the first two to three years as the building settles. They are the easiest type of damage to repair.
- Structural cracks. These are wider cracks, often 2mm or more, that can indicate movement in the building's frame or foundations. You will often see them radiating from corners of windows and doors. These need investigation before repair, because if the underlying cause is not addressed, the cracks will return.
- Blown or delaminated plaster. When plaster separates from the substrate behind it, whether that is brick, timber lath, or plasterboard, it needs to be cut out and replaced. There is no shortcut for this.
- Water damage. Leaking roofs, burst pipes, and rising damp all cause plaster to stain, soften, and crumble. Before any plaster repair, the source of moisture must be fixed. I have seen homeowners in Bathurst repair plaster three times before finally fixing the gutter that was causing the problem.
- Nail pops. In plasterboard homes, nails or screws can push through the surface as timber framing dries and moves. These are simple to fix but need to be done properly, not just filled and painted.
How We Repair Plaster Before Painting
Every plaster repair job starts with a thorough inspection. I personally walk through the property with the homeowner, tapping walls, checking corners, and identifying every area that needs attention. This is owner-supervised work. You should know exactly what is being repaired and why, because once the paint goes on, you cannot see the preparation underneath.
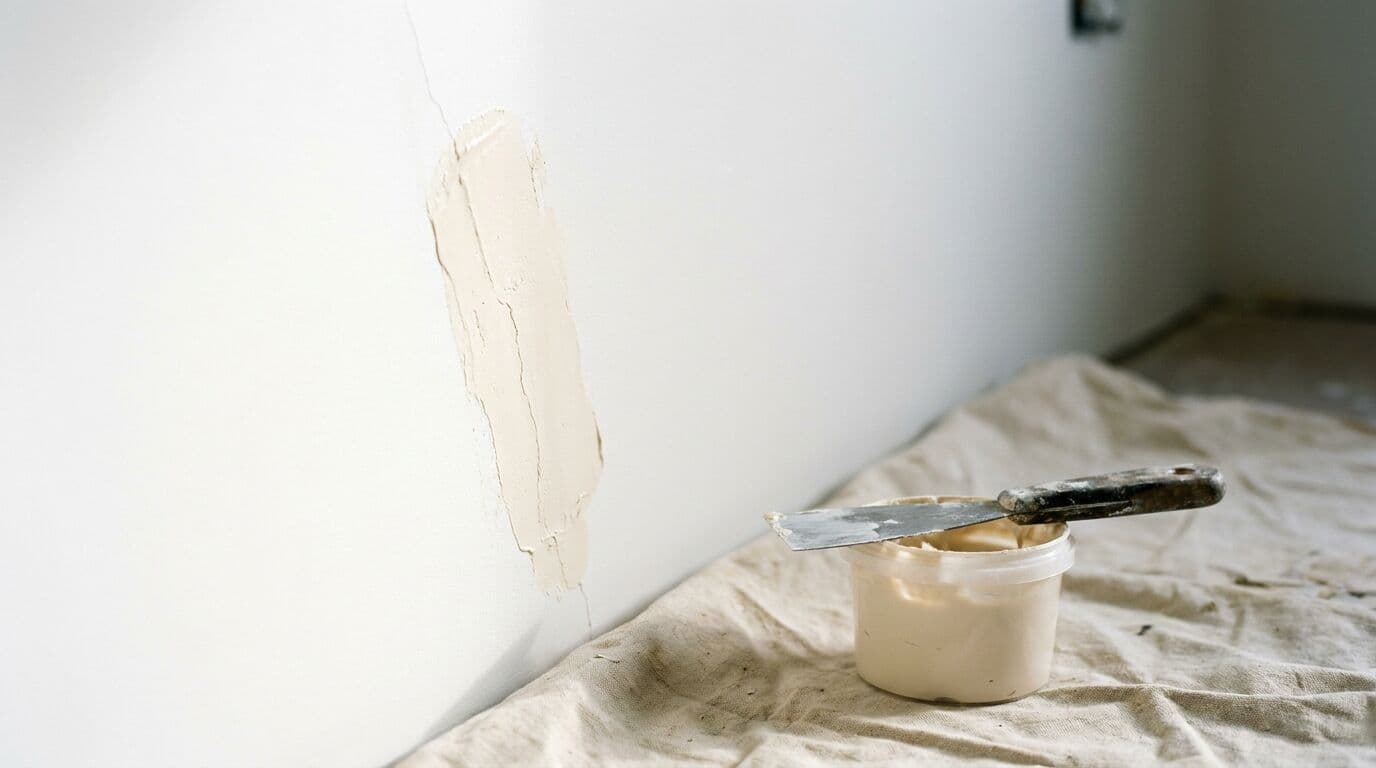
For hairline cracks, we open the crack slightly with a scraper, apply a flexible filler, and embed paper jointing tape over the repair. The tape bridges the crack and prevents it from telegraphing through the new paint. A single coat of filler without tape is a shortcut that does not last. The crack will reappear, usually within a few months, especially through our cold winters when buildings contract.
For larger repairs, we cut out the damaged section back to sound plaster, apply a bonding agent to the substrate, and build up new plaster in layers. Each layer needs to dry thoroughly before the next one goes on. In summer, drying times are short. In an Orange winter, with temperatures hovering around zero overnight, a single repair can take two to three days to dry properly between coats. Rushing this process leads to failure.
Once all repairs are complete, we sand everything smooth and apply a sealer coat. We use Dulux Precision Prep Seal or a similar high-quality primer sealer that bonds to both the existing surface and the new repair material. This creates a uniform surface for the topcoat and prevents the repaired areas from showing through as dull patches, a problem called "flashing."
What Happens If You Skip Plaster Repairs
I get called to fix paint jobs that have failed prematurely at least a dozen times a year. In almost every case, the problem is preparation, not the paint itself. Here is what happens when plaster repairs are skipped or done poorly.
- Cracks show through within weeks. Paint film is typically 0.1mm thick. It cannot bridge or hide a crack. Even if the crack appears to vanish when wet paint fills it, it will reappear as the paint dries and the building moves.
- Paint peels from loose plaster. If the plaster underneath is not bonded to the wall, the paint has nothing solid to grip. It will bubble, crack, and peel, sometimes in sheets.
- Moisture gets trapped. Painting over damp or water-damaged plaster seals moisture in. This accelerates the deterioration and can lead to mould growth behind the paint film, a health hazard that is expensive to remediate.
- The job looks patchy. Repaired areas absorb paint differently to the surrounding surface. Without proper sealing, you get visible differences in sheen and colour that no amount of topcoat will fix.
Costs and Timeframes
Plaster repair costs vary widely depending on the extent of damage. Here are some typical figures for homes in the Orange and Bathurst region.
- Minor crack repairs across a standard three-bedroom home: $300 to $600. This covers hairline cracks, nail pops, and minor surface damage. Allow one day of preparation time.
- Moderate repairs including some sections of damaged plaster, water stains, and multiple cracks: $600 to $1,200. Allow two to three days.
- Extensive repairs on older homes with blown plaster, lath repairs, or significant water damage: $1,200 to $2,000 or more. These jobs can add three to five days to the project timeline, particularly in winter when drying times are longer.
These costs are for the preparation work alone, separate from the painting itself. Some painters roll these into a single quote, which can make it hard to see what you are paying for. At Murrays Painting, we itemise preparation and painting separately so you know exactly where your money goes.
Old Homes vs New Builds
The type of plaster repair depends heavily on the age of your home. Older homes in Millthorpe and Carcoar, many dating back to the 1860s and 1870s, typically have lime plaster on timber lath or directly onto stone or brick walls. Repairing this type of plaster requires specific materials and techniques. Modern gypsum-based fillers do not bond well to lime plaster and can cause further damage by trapping moisture. We use lime-based repair products on heritage properties to ensure compatibility.
New builds around Orange and Blayney are constructed with plasterboard, which has its own set of issues. Settlement cracks at joins are almost guaranteed in the first two years. Nail pops are common as timber framing dries out. Cornice joins can separate. These are all normal and expected, and they should be repaired before any repaint. If you are painting a home that is two to five years old, a thorough plaster repair and preparation session will make an enormous difference to the finished result.
Why Preparation Is the Real Job
After fifty years in this trade, I can tell you that preparation is 60 to 70 percent of a quality paint job. The actual painting, rolling the topcoat on the walls, is the easy part. It is the hours of filling, sanding, sealing, and priming that determine whether the finish lasts two years or twenty. When we use premium products like Dulux Wash and Wear or Dulux Weathershield for the topcoat, we need the surface underneath to be perfect. Those paints are engineered to perform, but they cannot compensate for poor preparation.
This is why I supervise every job personally. I check the plaster repairs before any primer goes on. I check the primer before any topcoat goes on. Every step matters, and every step gets inspected. That level of attention is what separates a paint job that lasts from one that does not.
Get a Free Quote from Murrays Painting
If your home needs painting and you suspect there are plaster issues underneath, get in touch with Murrays Painting for a free, no-obligation quote. We will inspect the property, identify every area that needs repair, and give you an honest assessment of what is involved. We service Orange, Bathurst, Millthorpe, Blayney, Carcoar, and surrounding towns across the Central West. Call us or fill out the contact form on our website to book your free inspection.